Getting Started
1. Introduction
SDK Mobile is a set of libraries (Components) that offer a series of functionalities and services, allowing their integration into a Mobile application in a simple and totally scalable way. Certain components must be installed depending on the use case required. Its high level of modularity allows other new components to be added in the future without affecting those already integrated into the project.
1.1 Minimum requirements
The minimum version of the iOS SDK required is as follows:
- iOS: 13
2. Initial integration
This section will explain step by step how to integrate the basic components into an existing project.
2.1. Add private gradle repository
To access our remote repository, you must install Cocoapods on the computer.
For security and maintenance reasons, the new SDKMobile components are stored in private repositories requiring specific credentials. These credentials must be obtained through the Facephi support team. The steps to prepare the environment are the following:
- First of all, we launch the command to install cocoapods with Artifactory.
sudo gem install cocoapods-art
- In the case of using a Mac with an M1 chip, it exists the possibility of appearing errors during the installation, so it is recommended to use the following command instead:
sudo arch -arm64 gem install ffi; sudo arch -arm64 gem install cocoapods-art
If the issues still appear, try to uninstall Cocoapods and all the dependencies entirely and start a new clean installation.
- It is necessary to add the repository credentials in the file called netrc. For this task, from a Terminal, you have to execute:
$ nano ~/.netrc
And the following code snippet must be copied in that file:
machine facephicorp.jfrog.io
  login <USERNAME>
  password <TOKEN>
It is essential to copy the previous fragment exactly. There is an indentation before the login and password words formed by two spaces.
- Finally, it must be added the repository that contains the private dependencies:
pod repo-art add cocoa-pro-fphi "https://facephicorp.jfrog.io/artifactory/api/pods/cocoa-pro-fphi"
2.2. Dependencies required for basic integration
To avoid conflicts and compatibility problems, if you want to install the component in a project containing an old Facephi libraries (Widgets) version, these must be removed entirely before installing the SDKMobile components.
- Currently, FacePhi libraries are distributed remotely through different dependency managers, in this case, Cocoapods. Mandatory dependencies that must be installed beforehand (adding them to the Podfile):
plugin 'cocoapods-art', :sources => [
  'cocoa-pro-fphi’
]

source 'https://cdn.cocoapods.org/'

target 'Example' do
  pod 'FPHISDKMainComponent', '~> 2.0.0'

   post_install do |installer|
  installer.pods_project.targets.each do |target|
    target.build_configurations.each do |config|
      config.build_settings['EXPANDED_CODE_SIGN_IDENTITY'] = ""
      config.build_settings['CODE_SIGNING_REQUIRED'] = "NO"
      config.build_settings['CODE_SIGNING_ALLOWED'] = "NO"
    end
  end
end
...
end
-
To update the current dependencies, before executing the pod install command, it is necessary to use the following command that allows to update the local repository:
pod repo-art update cocoa-pro-fphi
2.3. Possible issues
If the integrator uses a Macbook with M1 Chip, the cocoapods-art installation may fail. Due to that, it is necessary to take into account the following:
-
If Cocoapods was installed using Homebrew it is possible to have several issues.
-
It is recommended to install cocoapods and cocoapods-art through Gem.
The following code snippet allows the developer to do the required steps to prepare the environment and solve the issues commented previously:
 #! /bin/zsh

install_cocoapods () {
    echo "Installing cocoapods with gem"
    # Creating new gems home if it doesnt't exist
    if [ ! -d "$HOME/.gem" ]; then
        mkdir "$HOME/.gem"
    fi
    # Adding to current session
    export GEM_HOME="$HOME/.gem"
    export PATH="$GEM_HOME/bin:$PATH"

    # Adding for future sessions
    if test -f "$HOME/.zshrc"; then
        echo 'Adding $GEM_HOME env var and then adding it to your $PATH'
        echo '' >> "$HOME/.zshrc"
        echo 'export GEM_HOME="$HOME/.gem"' >> "$HOME/.zshrc"
        echo 'export PATH="$GEM_HOME/bin:$PATH"' >> "$HOME/.zshrc"
        echo 'alias pod='arch -x86_64 pod'' >> "$HOME/.zshrc"
    fi

    # Installing cocoapods
    gem install cocoapods
    sudo arch -x86_64 gem install ffi
    which pod
    pod --version
    gem install cocoapods-art
}

uninstall_cocoapods_homebrew () {
    which -s brew
    if [[ $? != 0 ]] ; then
        echo "Homebrew not installed, skipping uninstalling cocoapods from homebrew"
    else
        brew uninstall cocoapods
    fi
}

if ! type "pod" > /dev/null; then
    echo "You don't have cocoapods installed..."
else
    echo "Trying to uninstall it from homebrew first"
    uninstall_cocoapods_homebrew
fi

install_cocoapods
In the case of using xCode15, it is recommended to use the following configuration:
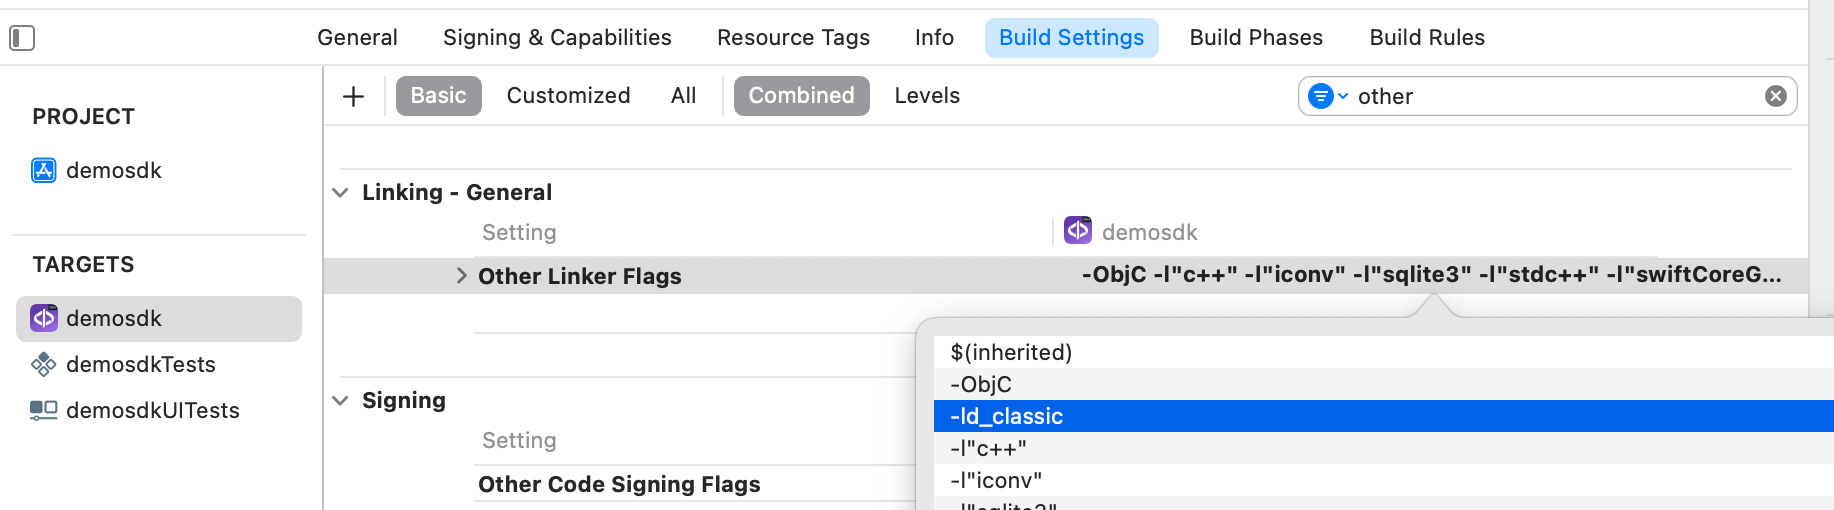
The -ld_classic flag must be added in Other Linker Flags in the Build Settings section of the application.
3. SDK initialization
It must be strictly avoided to initialize a controller that will not be used.
Each component has a Controller that will allow access to its functionality. Before they can be used, they must be properly initialized. The steps to follow in the initialisation are as follows:
-
Include the Application object
-
Decide whether the license will be included via a String or a remote licensing service (see section 3.1).
3.1 License injection
As discussed above, there are currently two ways to inject the license:
a. Obtaining the license through a service
Through a service that requires a URL and an API-KEY as an identifier. This would avoid problems when manipulating the license, as well as the constant replacement of these licenses when a problem arises (malformation or improper modification, expiry of the license...).
// AUTO License
SDKController.shared.initSdk(licensingUrl: "https://...", apiKey: "...", output: { sdkResult in
    if sdkResult.finishStatus == .STATUS_OK {
        self.log("Licencia automática seteada correctamente")
    } else {
        self.log("Ha ocurrido un error al intentar obtener la licencia: \(sdkResult.errorType)")
    }
}, trackingController: trackingController)
b. Injecting the license as a String
You can assign the license directly as a String, as follows:
// MANUAL License
SDKController.shared.initSdk(license: "LICENSE", output: { sdkResult in
    if sdkResult.finishStatus == .STATUS_OK {
        self.log("Licencia manual seteada correctamente")
    } else {
        self.log("La licencia manual no es correcta")
    }
}, trackingController: trackingController)
3.2 Optional
The following controllers are optional, they are added at the end of the initSDK as follows:
3.2.1 TrackingController
The TrackingController controller will only be added in case you have sdkMobile tracking.
The import is added:
import trackingComponent
trackingController: trackingController
We initialize:
let trackingController = TrackingController(trackingError: { trackingError in
      print("TRACKING ERROR: \(trackingError)")
})
Added in the initSDK:
// AUTO License
SDKController.shared.initSdk(licensingUrl: "https://...", apiKey: "...", output: { sdkResult in
    if sdkResult.finishStatus == .STATUS_OK {
        self.log("Automatic license successfully set")
    } else {
        self.log("An error occurred while trying to obtain the license: \(sdkResult.errorType)")
    }
}, trackingController: trackingController)
3.2.2. TokenizeController
Added import:
import tokenizeComponent
Initialise:
let tokenizeController = TokenizeController()
We add in the initSDK:
// AUTO License
SDKController.shared.initSdk(licensingUrl: "https://...", apiKey: "...", output: { sdkResult in
    if sdkResult.finishStatus == .STATUS_OK {
        self.log("Automatic license successfully set")
    } else {
        self.log("An error occurred while trying to obtain the license: \(sdkResult.errorType)")
    }
}, tokenizeController: tokenizeController)
3.2.3 StatusController
Se añade el import:
import statusComponent
Inicializamos:
let statusController = StatusController()
Se añade en el initSDK:
// AUTO License
SDKController.shared.initSdk(licensingUrl: "https://...", apiKey: "...", output: { sdkResult in
    if sdkResult.finishStatus == .STATUS_OK {
        self.log("Automatic license successfully set")
    } else {
        self.log("An error occurred while trying to obtain the license: \(sdkResult.errorType)")
    }
}, statusController: statusController)
4. Start a new operation
Every time you want to start the flow of a new operation (examples of operations would be onboarding, authentication, videoCall, etc.), it is essential to tell the SDKController that it is going to start so the SDK will know that the following Component calls (also called Steps) will be part of that operation. This is necessary to track the global information of this operation on the platform in a satisfactory way.
When starting a process or flow, always call the newOperation method
This method has three input parameters:
-
operationType: Indicates whether an ONBOARDING or AUTHENTICATION 2 process is to be performed.
-
customerId: Unique user ID if available (controlled at the application level).
-
steps: List of steps of the operation if they have been previously defined.
There are two ways to perform this operation start, depending on whether the steps that will form the flow of the registration or authentication process are known (in case the components are executed sequentially and always in the same way) or, on the contrary, if the flow is not defined and is unknown (for example, the final customer is the one who decides the order of execution of the components).
- Known flow (the tracked operation will appear on the platform with all the steps in the list). Example of implementation:
SDKController.shared.newOperation(operationType: OperationType.X, customerId: "customerId", steps: [.SELPHI, .SELPHID, .OTHER("CUSTOM_STEP")], output: { _ in })
- Unknown flow (the tracked operation will appear on the platform with ellipses). Example of implementation:
SDKController.shared.newOperation(operationType: OperationType.X, customerId: "customerId", output: { _ in})
sdkResult → Contains in data the information of the operation created.
Once the operation has been created, the SDK components associated with this operation can be executed. Consult the specific documentation for each component to find out how to do this.
4.1 Existing types of operation
Currently, the following operations exist, during which certain Components (STEPS) are used.
Below is a table showing the relationship between operations and steps:
| Operation (OperationType) | Component (Step) | Description |
|---|---|---|
| ONBOARDING | SELPHI_COMPONENT SELPHID_COMPONENT | - Facial validation of a selfie against a document's face - Document OCR extraction - Liveness detection |
| AUTHENTICATION | SELPHI_COMPONENT | - Face validation using templates - Liveness detection |
This list will be expanded in future SDK updates as new components and use cases are released.
5. Launch of components
Once the new operation has been created (section 4), the different SDK drivers can be launched. To consult this information, access the documentation for each component.
 let controller = SelphiController(data: selphiConfigurationData, output: output, viewController: viewController)
 SDKController.shared.launch(controller: controller)
6. Result return
The result of each component will be returned through the SDK always keeping the same 3-field structure:
-
finishStatus: This will indicate whether the operation has been successfully completed. Possible values
FinishStatus.STATUS_OK,FinishStatus.STATUS_ERROR. -
errorType: If finishStatus indicates that an error has occurred, this field shall contain the description of the error.
-
data: This shall contain the response data from the SDK function. This field will be different depending on the component that has been executed.
The documentation for each specific component will provide a breakdown of the different fields that this object can return.
7. Close session / Logout
Before the application is destroyed, the SDK session must be closed to notify the platform of its completion. To do this, the following line of code is executed:
SDKController.shared.closeSession()
If a logout is performed, it will not be possible to launch controllers until a new operation is started again.
8. Error control
When calling any of the components, we will always have an output of type SdkResult as a response, as we see in the example code:
         let controller = ComponentController(data: ComponentConfigurationData, output: { sdkResult in
            print(sdkResult.errorType)
         }, viewController: viewController)
         SDKController.shared.launch(controller: controller)
In the .errorType attribute, we will have the typology of the error. The error types are defined in the documentation of each component.
The error codes you may receive are as follows.
public enum ErrorType: String, Error {
     case NO_ERROR
     case UNKNOWN_ERROR
     case OTHER(String)
     case COMPONENT_CONTROLLER_DATA_ERROR
     case NO_OPERATION_CREATED_ERROR
     case NETWORK_CONNECTION
     case CAMERA_PERMISSION_DENIED
     case MIC_PERMISSION_DENIED
     case LOCATION_PERMISSION_DENIED
     case STORAGE_PERMISSION_DENIED
     case CANCEL_BY_USER
     case TIMEOUT
     case LICENSE_CHECKER_ERROR_INVALID_LICENSE
     case LICENSE_CHECKER_ERROR_INVALID_COMPONENT_LICENSE
}
If there is no error and the result is returned correctly, the errorType would be NO_ERROR.
9. SDK Customization
Customization is done using a component class called ThemeComponentManager. Where Component must be replaced with the desired component.
For example, videoidComponent contains ThemeVideoIdManager, while videocallComponent ThemeVideoCallManager...
This manager has an instance of type ThemeComponentProtocol. If we want to customize any details, we would have to create a new class that attaches to this interface and inject it into the ThemeComponentManager.
class CustomThemeComponent: ThemeComponentProtocol {
     var images: [R.Image: UIImage?] = [:]

     var colors: [R.Color: UIColor?] = [R.Color.MessageText: UIColor.red]

     var name: String {
         "custom"
     }

     var fonts: [R.Font: String] = [.regular: UIFont(...)]

     var dimensions: [R.Dimension: CGFloat] {
         [.fontBig: 8]
     }
}
This should always be done after having initialized the driver of the component we want to use/customize:
//Controller component initialization
let controller = ComponentController(...)
// Instance of the custom instance
ThemeComponentManager.setup(theme: CustomThemeComponent())
// Controller launch
SDKController.shared.launch(controller: controller)