Video Recording Component
0. SDK Mobile baseline requirements
SDK Mobile is a set of libraries (Components) that offers a series of functionalities and services, allowing in turn its integration into a mobile application in a simple and completely scalable. Depending on the use case required, it must be perform the installation of certain components. Its high level Modularity allows, in the future, to add other new components without affecting in any way those already integrated into the project.
For more information on the base configuration, go to the Getting Started section.
1. Introduction
The Component discussed in the current document is called VideoRecording Component. This is responsible for capturing the screen of the device in the background. It is mainly oriented for recording of the onboarding process.
1.1 Minimum requirements
The minimum iOS SDK version required is as follows:
Minimum iOS version: 13
2. Integration of the component
⚠️ Before integrating this component, it is recommended to read the documentation related to Initial Integration and follow its instructions.
This section will explain step by step how to integrate the current component into an existing project.
2.1 Dependencies required for integration
Currently FacePhi libraries are distributed remotely through different dependency managers.
2.1.1 Cocoapods
The mandatory dependencies that must have been previously installed (adding them to the project's Podfile file) are:
pod 'FPHISDKMainComponent', '~> 2.6.0'
-
It is recommended to also use the VideoRecording component with the tracking component (
FPHISDKTrackingComponent). -
To install the current component, the following entry must be included in the application's Podfile:
pod 'FPHISDKVideoRecordingComponent', '~> 2.6.0'
-
This dependency must be declared within the target of the app and the extension (the latter will be explained below)
-
An example of what the Podfile would look like:
target 'demoApp' do
...
   pod 'FPHISDKMainComponent', 'X.Y.Z'
   pod 'FPHISDKVideoRecordingComponent', 'A.B.C'
   pod 'FPHISDKTrackingComponent', 'D.E.F' ### Optional, recommended
...
end
target 'VideoRecording' do ### Our extension target
   use_frameworks! ### We want to use frameworks instead of Static Libs
   pod 'FPHISDKVideoRecordingComponent', 'A.B.C'
end
NOTE: You have to be careful to put the extension target outside the application target. Failure to do so would cause the application pods to also be compiled into the extension, resulting in collateral problems.
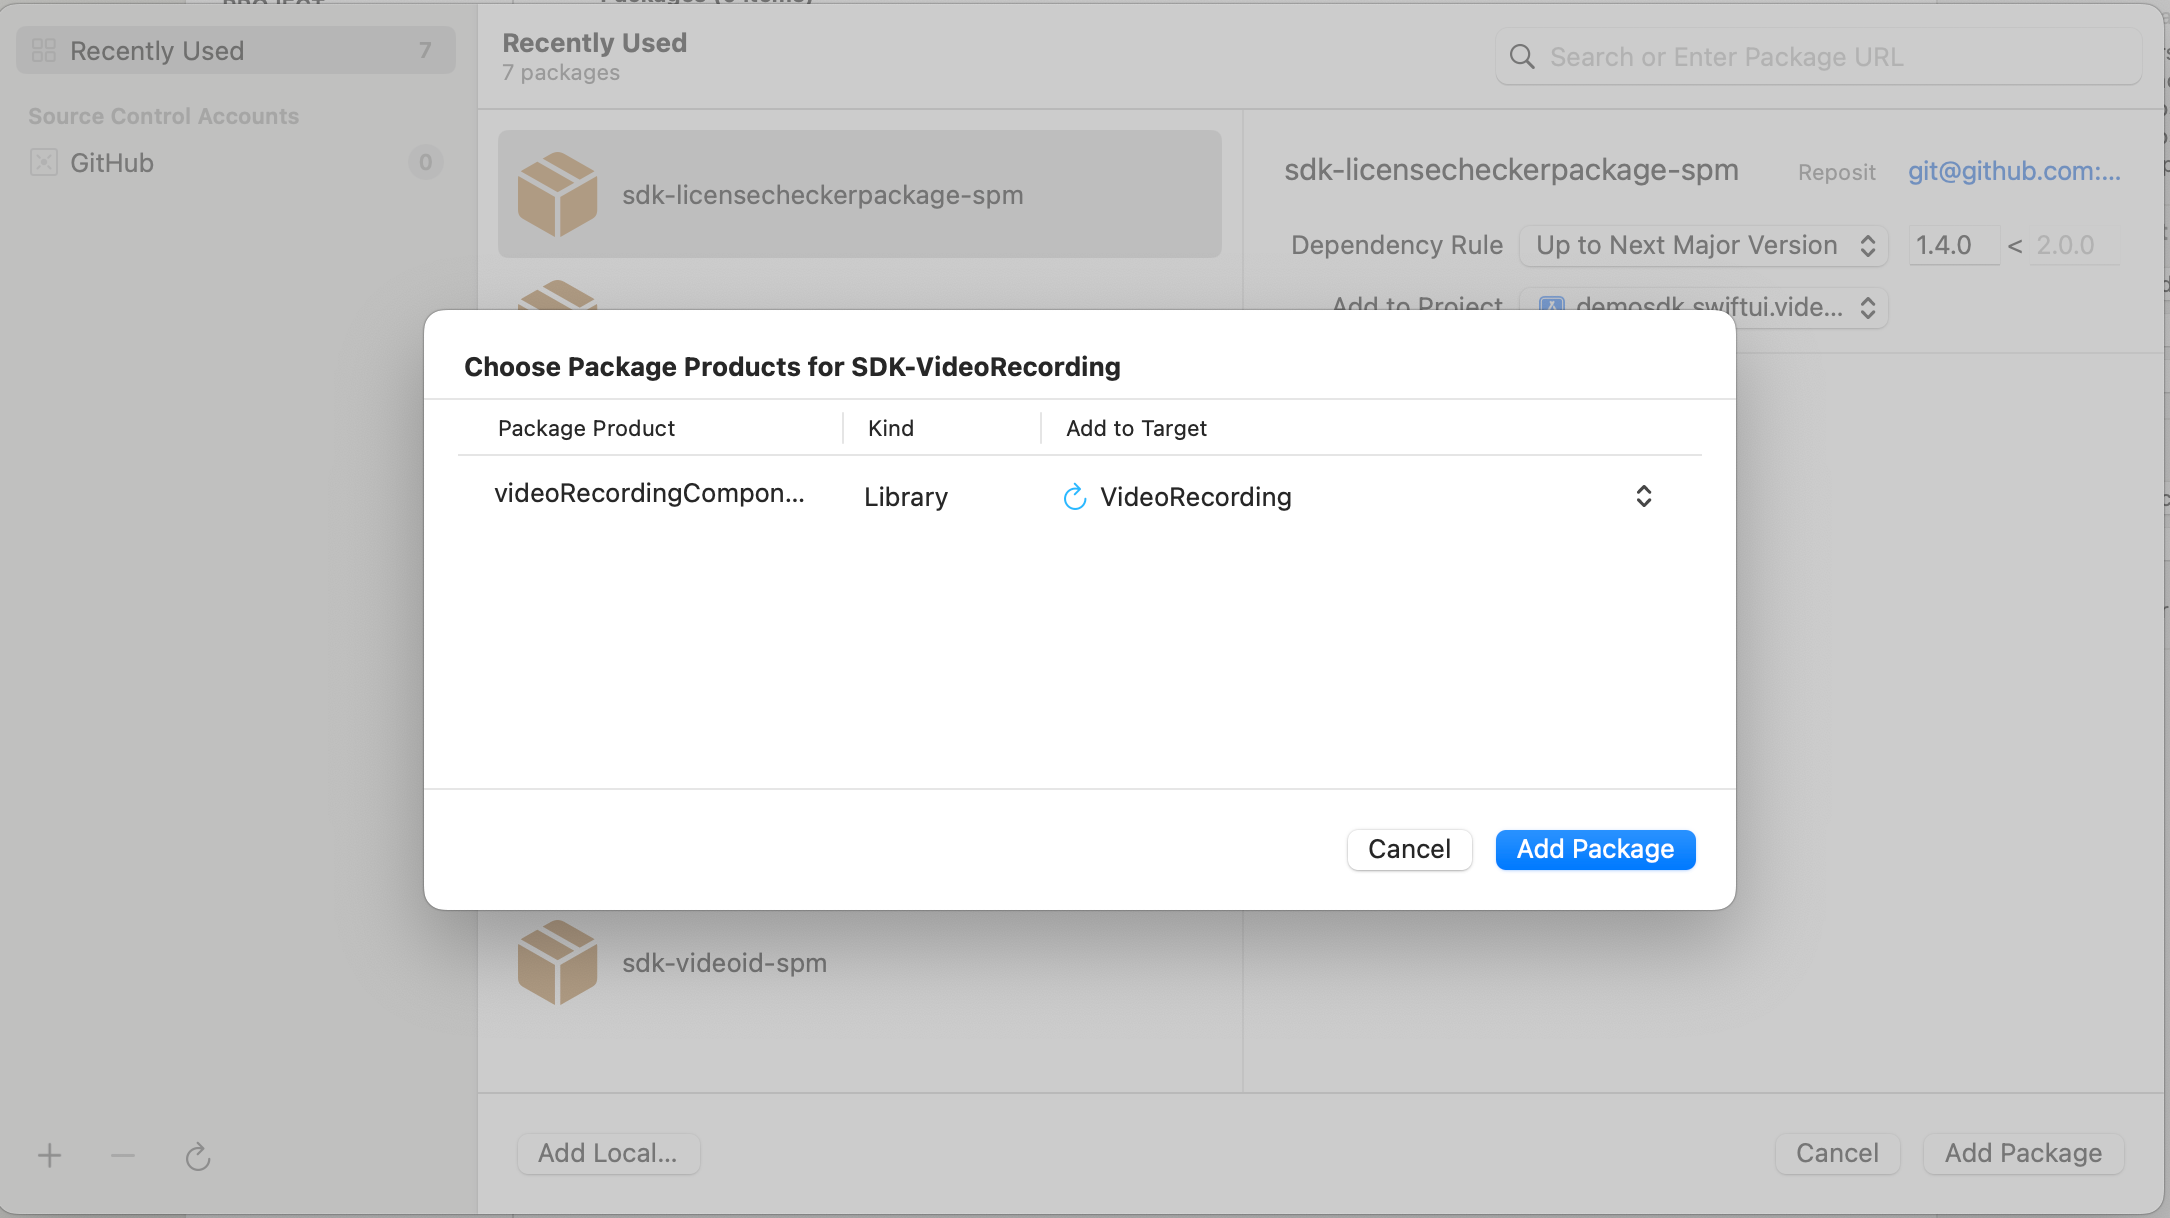
2.1.2 SPM
We add our dependency to the project and assign it to the VideoRecording target:
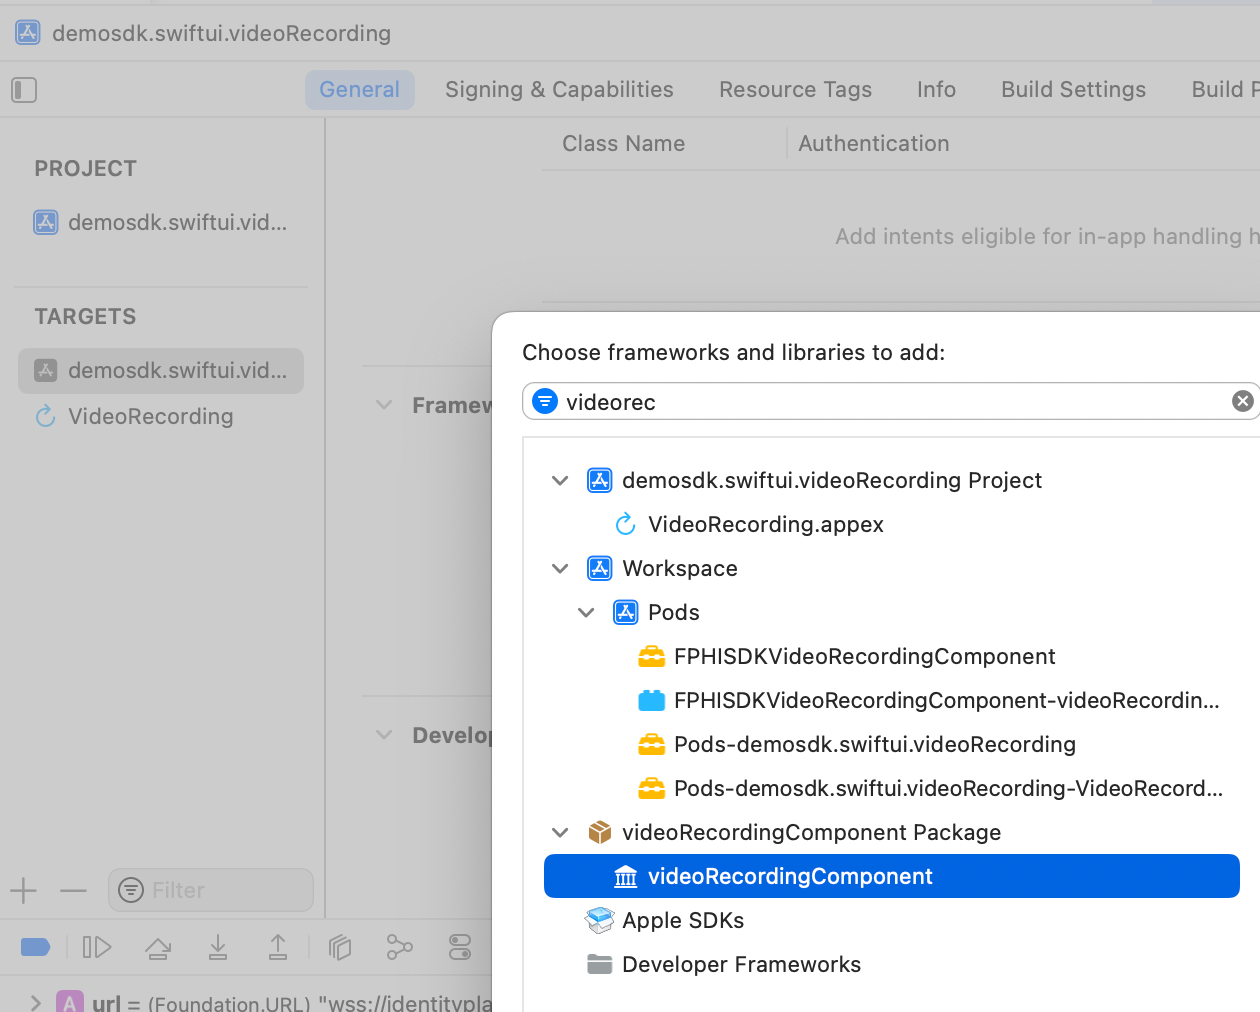
We must then also add it to the target of the app in General → Framework, Libraries and Embedded Content:
3. Start new operation
In order to generate the associated information correctly in the platform, the newOperation command must be executed first.
ℹ️ This command must have been executed before launch.
To learn more about how to start a new operation, it is recommended to consult the Start a new operation documentation, which details and explains what this process consists of.
4. Use of component
4.1 Creating the instance
The functionality is configured and launched with a class called VideoRecordingController.
To create an instance we need to use its init() method:
init(data: VideoRecordingConfigurationData?, extensionIdentifier: String?, output: @escaping (SdkResult<String>) -> Void)
data: The configuration objectextensionIdentifier: The Bundle Identifier of theBroadcast Upload Extensiontarget we created.output: The callback that is called when the instance's start is resolved (either with success or failure). For this component, the success is called when the connection with the backend is established and the screenshare has started.
4.2 Configuring the instance
With the configuration data (VideoRecordingConfigurationData) you can also modify:
- Optional data that is normally included within the license
- url: Path to the video socket.
- apiKey: ApiKey required for connection to the video socket.
- tenantId: Tenant identifier that refers to the current client, necessary for the connection to the video service.
- extractionTimeout: How long (milliseconds) will the component wait for the socket before generating a timeout error.
- showDiagnostic: If an error occurs, the error will be displayed on the screen in addition to being sent with the output.
4.3 Launching the component
Once we have set a new operation (Section 3) and have an instance of our controller, we can start it. There are two ways to launch it:
- [WITHOUT TRACKING] This call allows the component's functionality to be launched normally, but no event will be tracked to the tracking server:
let controller = VideoRecordingController(data: VideoRecordingConfigurationData(), extensionName: "VideoRecording", output: { _ in })
SDKController.shared.launchMethod(controller: controller)
- [WITH TRACKING] This call allows the component's functionality to be launched normally, but internal events to the tracking server will be tracked:
let controller = VideoRecordingController(data: VideoRecordingConfigurationData(), extensionName: "VideoRecording", output: { _ in })
SDKController.shared.launch(controller: controller)
Note:
The launch method should be used by default. This method allows you to use tracking if your component is activated, and will not use it when it is deactivated (or the component is not installed).
On the contrary, the launchMethod method covers a special case, in which the integrator has tracking installed and activated, but in a given flow within the application they do not want to track information. In that case, this method is used to prevent that information from being sent to the platform.
5. Component customization
5.1 Colors
- The only customizable color is:
case sdkPrimaryColor
To modify it, you need to override the asset by creating a similar named asset in the Bundle.main of your application.
5.2 Texts
The literals used in the component are:
"video_recording_component_title_message"="Allow screen capture in %@?";
"video_recording_component_desc_message"="This application will capture your screen and you will not have a chance to review it.";
"video_recording_component_cancel_message"="Don't allow";
"video_recording_component_confirm_message"="Record screen";
6. Common errors and problems
6.1 At compile time
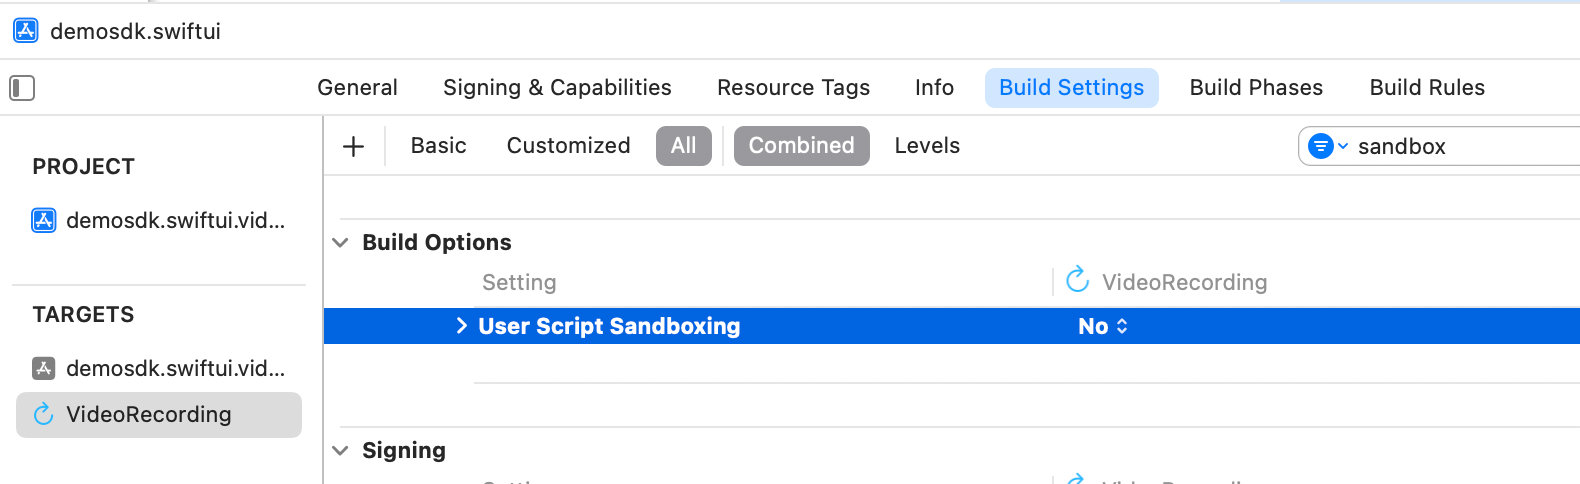
6.1.1 Write permissions - Sandbox: rsync.samba(67364) deny(1) file-write-create
If you see a compilation error regarding write permissions:

Check the status in Build Settings of the parameter ENABLE_USER_SCRIPT_SANDBOXING, its value must be NO.
6.2 At runtime
6.2.0 Debug an extension (.appex)
To debug an extension, we need to attach it to a launchable target. In this case, that would be our main app's target.
6.2.1 Starscream - EXC_BAD_ACCESS
When launching the component an error may appear in the Starscream dependency:

Workaround - Upload the minimum Pod version from iOS11 to iOS12:

6.2.2 QuickTime Player
When launching the component, if the iPhone is connected and already sharing screen through a QuickTime Player recording session, it won't work.
Solution - Close the QuickTime Player session.
6.2.3 Screen Sharing doesn't get started
When launching the component, we can't see the native prompt for screen sharing or we see it but it doesn't get started.
Possible Cause: The extension created in your app has a Bundle Identifier. If that identifier has changed, maybe the old one is still persisted in the cache.
Possible Solution - Remove the app, and install it again. Restart the device if needed.
Possible Cause: The device already has a extension with the same Bundle Identifier.
Possible Solution - Make sure the extension's Bundle Identifier is unique
Possible Cause: The device already has a extension with the same Name.
Possible Solution - Make sure that you are launching/selecting the correct screensharing extension. It is recommended to use (in development at least) unique names to avoid misunderstandings.
Possible Cause: The extensionName's string value injected in the VideoRecordingController initialization isn't correct.
Possible Solution - Make sure that you initialize send
Possible Cause: The extension's target is not referenced or doesn't install the FPHISDKVideoRecordingComponent dependency in the Podfile.
Possible Solution - Check Cocoapods Section